Friday 7 February 2014

*PALEO* Lamingtons!


So you know that craze that's going around? The "Paleo" craze? No?

Basically it's a new-fangled diet (or rather...an old diet), which is based upon the supposed foods which palaeolithic humans ate thousands of years ago. It's a diet free of grains (i.e. wheat, rice, oats...etc.), sugar, foods high in starches (like potatoes or corn), dairy products, and other processed foods.

The concept is to eat a diet which is high in protein and healthy fats, and low in sugars and carbohydrates.


At first, it sounds daunting. I mean, I instantly began to think about all the foods I couldn't eat; pizza...cake...pizza...

However, I was actually so surprised about the amount of recipes I found which were deemed "paleo". True, I'm not following the diet super strictly - I have been living off of mango smoothies a little - but I've been doing just as much baking as before, with excellent results :)


Take, for instance, these lamingtons I made for Australia Day. I will admit, they're not at all like the fluffy, sweet, chocolatey creations you can buy for a few dollars at Coles; but they come pretty damn close, especially if you're not used to eating a lot of sugar.

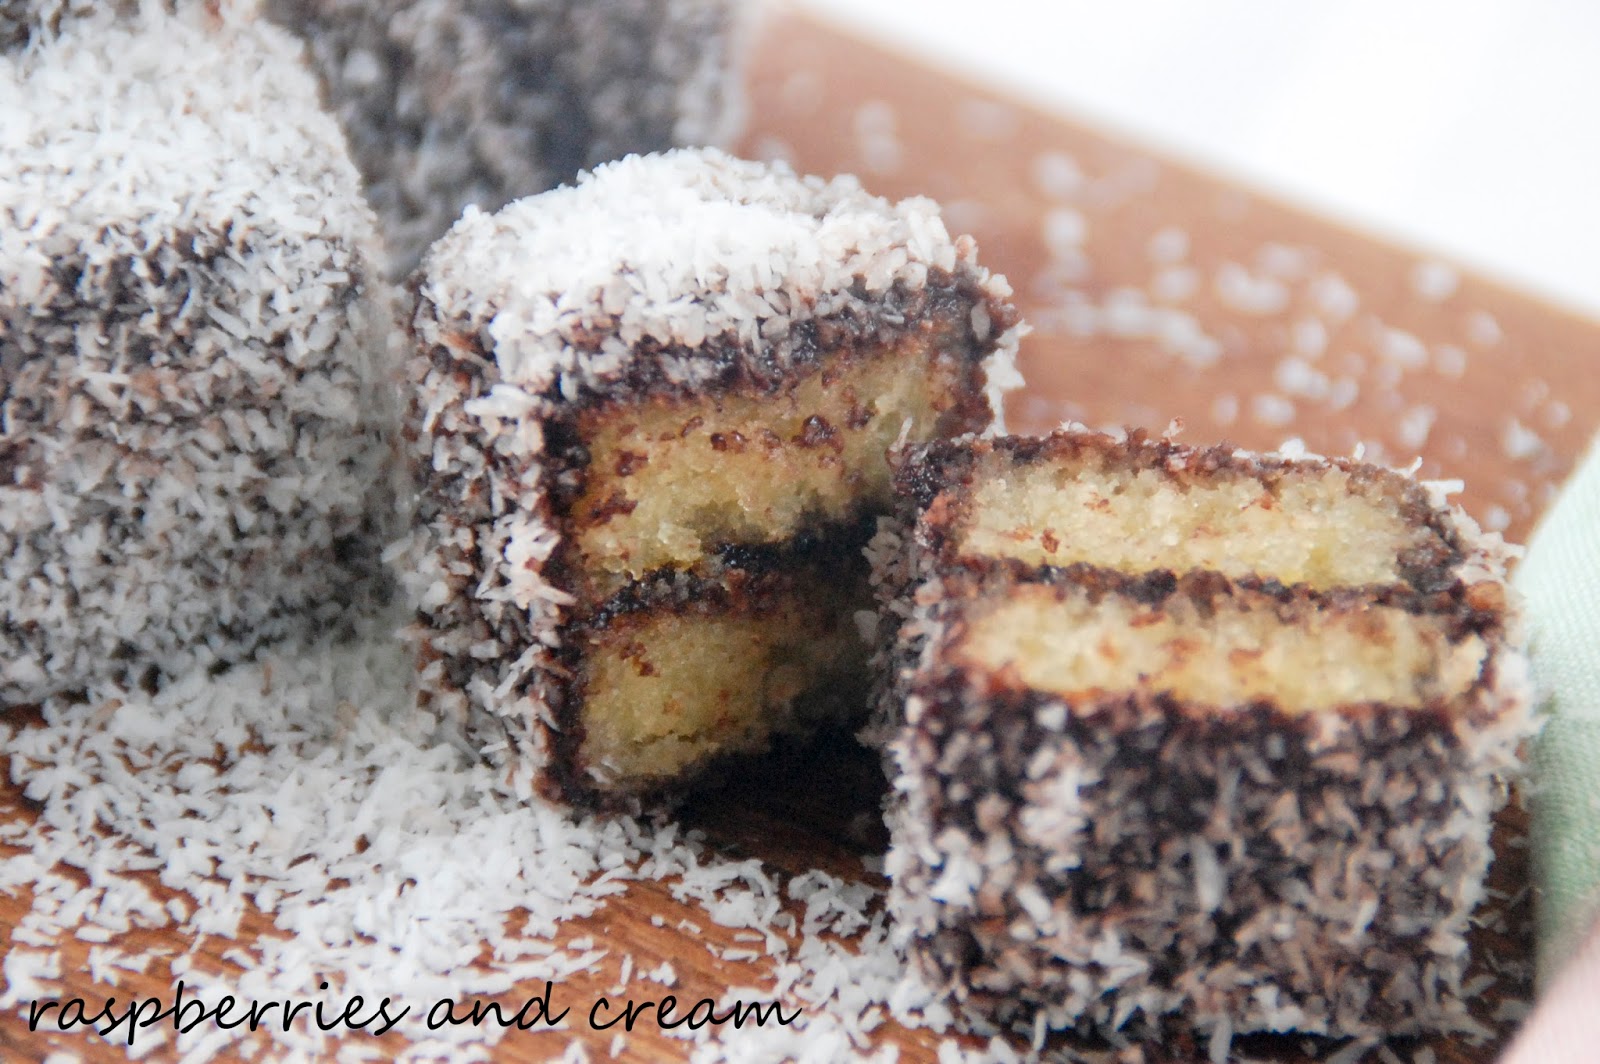
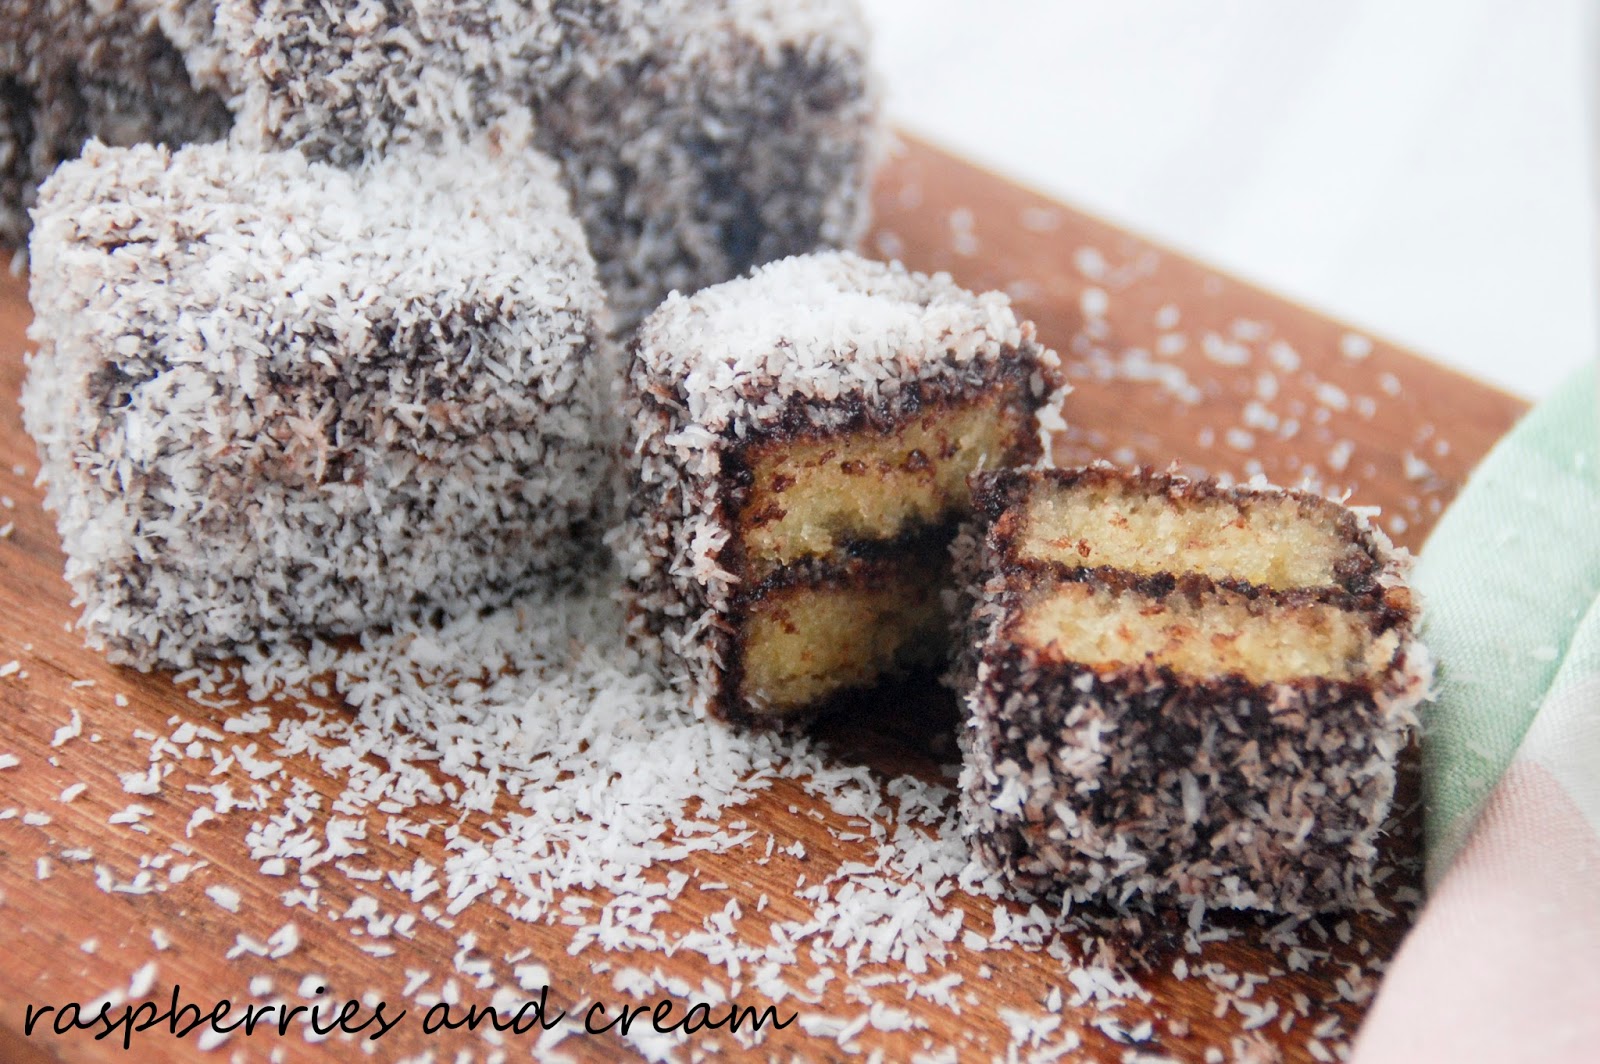
And, if you feel slightly alarmed by the whole "paleo" idea, just think of these as being grain free, gluten free, sugar free and dairy free lamingtons. Actually, on second thoughts, that doesn't really sound too appetising. You get my gist, though...?

(Recipe adapted from Eat Drink Paleo because I'm not smart enough to make it up myself)


Paleo Lamingtons:

Sponge:
3 eggs
1/2 cup of tapioca or arrowroot starch
3/4 cup of almond meal
1 teaspoon of baking powder
A generous 1/2 cup of coconut oil
1/4 cup of honey
1 teaspoon of vanilla extract

Icing:
1/2 cup of cocoa powder
2/3 cup of coconut oil
2 tablespoons of honey
1 teaspoon of vanilla extract
3 tablespoons of coconut milk (I'm lazy, so I just used regular milk)

1 1/2 cups of dessicated coconut


  1. For the sponge: Beat together the coconut oil, honey and vanilla extract. In a separate bowl, beat the eggs for a good five minutes until thick and foamy, then add the coconut oil/honey/vanilla in a thin stream.
  2. Using a whisk, fold in the baking powder, tapioca and almond meal until just combined.
  3. Pour the mixture into a lined lamington tin (approximately 20cm by 30cm) at 165C for 20 minutes.
  4. For the icing: Combine the cocoa, coconut oil, honey, vanilla and milk and whisk until smooth. It is quite a runny mixture.
  5. To assemble: Cut the sponge in half lengthways. Spread chocolate icing on one half and top with the other half of the sponge, so you have one giant lamington-sandwich sort of thing going on.
  6. Cut your giant sandwich into whatever size lamingtons you like. I cut it into 2cm-wide fingers, then cut each of those fingers in half again. Set up the icing in a bowl, and the dessicated coconut in another bowl or spread on a plate. 
  7. Dip each lamington first into the chocolate, then cover it completely with coconut. They taste best if they've been left for a couple of hours for the chocolate to soak in a little, and will become quite firm if they're stored in the fridge.
So there you go. Lamingtons probably aren't the best introductory recipe to paleo-ism, but that's what I felt like and this is my blog. Deal with it! Hahaha, I kid :) Thanks for reading, and make sure you tell me what you think if you get a chance to make these beauties!


Saturday 18 January 2014

Camembert and Sour Cherry Pastries


HAPPY NEW YEAR!

Okay, so I know that I'm almost three weeks late. But I've just been so busy keeping my New Year's resolutions...*it's times like these I think I need a sarcasm font*

Considering one of my goals was to blog more, maybe you can tell that I'm not doing so well in the keeping-resolutions-department. However, absence makes the heart grow fonder or something, right? So really my laziness is a blessing in disguise to you guys :D


But enough about me - how about you guys? Did you have a nice Christmas and New Year? Unlike me, have you been able to actually begin to keep your New Year's resolutions so far? And would you like to learn how to make the most amazing camembert and sour cherry pastries? (Of course you would. Good answer.) Originally, I was meant to upload this as a finger food idea for a New Years Eve party idea...but that didn't really work out somehow. My suggestion is to just throw another party in honour of these pastries because they are just the cutest.

Anyway. I hope the next 49 weeks of your year are amazing and wonderful and everything else that people say on New Year's. Also, just a reminder that Christmas is in 340 days...

I'm so sorry. I'll stop now.

Kenz x


Camembert and Sour Cherry Pastries

2 sheets of puff pastry, thawed
Approximately half a round of camembert cheese
1/4 to 1/3 cup of unsweetened cherry jam - you could also use whatever preserves are usually served with cheese, if you wanted to
1 egg, beaten together with 1 tablespoon of milk
Sea salt


  1. Cut each sheet of puff pastry into 24 rectangles. If you prefer larger or smaller pastries, then you can change the size to whatever you fancy - just make sure that it is an even number, so that each pastry has a lid.
  2. Lay half of the rectangles on a baking tray. Brush with the egg mixture and lay a slice of camembert - rind and all - onto the rectangle. Top with a small teaspoon of jam and cover with a pastry lid. You may have to stretch the lid a little so that it fits over the top of the cheese-and-preserves.
  3. Crimp the edges with a fork, or a fancy pastry crimper if you have one. I don't. Brush each parcel with more of the egg wash and sprinkle with sea salt.
  4. Bake at 190C for 12 - 15 minutes, or until golden brown. I was a leetle bit impatient and so some of mine weren't quite brown enough. They can be served both warm and room temperature; if they're not all eaten in one sitting (which would surprise me greatly), they should be stored in the refrigerator.
I hope you enjoy!


Saturday 14 December 2013

Vanilla Bean Buttermilk Ice Cream


Summer.

Normally, I would utter that word with disgust. Honestly, Australian summer (when you don't own air conditioning or a pool) sucks so much - it's perpetually muggy, there are kookaburras at four in the morning and many, many mosquitoes. Actually, change that to a significantly large amount of all bugs in general.


However, the pros of Summer here are a) the thunderstorms (ahem - cue Sounds of Then by GANGgajang) and b) the random days, such as today, when the weather does something right and everything is pleasant. No, really, for the past few days there have been clear skies and it's been hot but not humid and I've been to pool parties and been Christmas shopping and everything is just nice. It's times like these I feel especially patriotic. And trust me...there are many times I don't feel particularly patriotic. Like when I find spiders in my bed. Yeah. Not cool, Mr Spider.


Anyway, I bring this post to you as a peace offering (it's been a whole month already since my last post. Can you believe it?), although in my defence my computer was 100% kaputt for most of that time. Like, my hard drive just casually upped and died and now I have to start from scratch again...oh well.

So yes. This recipe is perfect for summer, and exceedingly easy to make. Give it a go - even if you're one of those privileged people who live in the Northern Hemisphere where it is nice and snowy :) I'm definitely going to do a proper Christmas post this year, so I'll see you then!


Live long and prosper,
Kenz x

(Sorry. I've been watching too much Star Trek. It sort of just slipped out.)


Vanilla Bean Buttermilk Ice Cream

600ml of buttermilk
The seeds of 1 vanilla bean / 1 teaspoon of vanilla paste / 2 - 3 teaspoons of vanilla extract
300ml of cream
1 cup of caster sugar


  1. In an electric mixer, beat the buttermilk and sugar for 2 minutes, or until the sugar dissolves. Stir in the cream and vanilla.
  2. Pour into an ice cream maker and follow the directions for the machine; alternatively, pour into a freezer-safe container and freeze for a few hours, or until mushy. Beat or whisk the icecream until smooth, then freeze for a few hours more. Repeat the process 2 - 3 more times, until no more ice crystals form.
  3. Keep in the freezer in an airtight container.
Just as a side note, this tastes amazing with crushed Maltesers mixed through. I don't know why, but it does.


Friday 27 September 2013

Crumpets.


Can I just say, I've never looked forward to the holidays as much as I have this term. I don't really know why, but I was so excited for school to finish, even if it is only for the next two weeks.

And what better way is there to celebrate finishing 3/4 of the year? By making home made crumpets, of course! What do you mean, throw a party or hang out with friends? No, crumpets are all you need in life. Well, crumpets, chocolate and a good book, maybe.


To get back to my story, I was actually so surprised at how easy these things are to make. They have yeast in them, so I guess you could classify them as bread, but they basically are the same as pancakes. Honestly, give them a go - they taste so much better than the store bought ones! :)


Crumpets

1 cup + 1 1/2 tablespoons of plain flour
2 tablespoons of dry milk powder
1 teaspoon of instant dried yeast (3g)
1/2 teaspoon of sugar
1/2 teaspoon of salt
3/4 cup + 2 tablespoons of room temperature / lukewarm water
1/4 teaspoon of bicarb soda


  1. Mix together the flour, milk, yeast, sugar and salt. With an electric mixer, beat in 3/4 cup of water on a low speed. Raise the speed to medium, and beat the batter for five minutes.
  2. Scrape down the sides of the bowl and leave in a warm place to rise for an hour, or until doubled in size.
  3. When it has risen, mix the bicarb soda and extra water together and stir into the batter - it will be full of bubbles, but then it will deflate - and leave it to rise for another half an hour, or until almost doubled in size.
  4. Grease some egg rings with oil or ghee (just as a sidenote, ghee (clarified butter) is amazing for frying pancakes and things in), and heat up a frying pan. Pour or ladle a little of the batter into each of the egg rings, until they are half full. Leave to cook until bubbles rise and the tops are no longer glossy. urn over and let them brown a little on the other side.
  5. To serve: toast the crumpets lightly in a toaster until the outsides are crisp and the insides are still soft, the slather them with butter and honey. To store: they are best eaten on the day they are made, or they can be well wrapped and frozen for as long as you want. 


Monday 9 September 2013

Salted Caramel Popcorn

Today, I discovered that our salt was pink.
(Why it's pink, I don't know. Just go with it.)


How did I discover this? Because I was making salted caramel popcorn.


Why was I making salted caramel popcorn? Well, because I was hungry, I suppose. I don't really know.

Why was I hun okay, I'll stop now.

Basically, to explain my ramblings a little bit, exam block is the best. As impossible as that sounds, I love exam block because I get to stay home from school when I have no exams and it's the best. feeling. ever.
And as everybody knows, the best brain food for the exam-ing mind is caramel popcorn, with extra salt on top because hey, who needs to be individual when you can follow the putting-salt-on-sweet-foods-where-it-shouldn't-go-craze...?

But in all seriousness, this stuff is surprisingly easy to make, and is even easier to eat, which is not as surprising. Just two words of warning, though...highly addictive.


Salted Caramel Popcorn

115g of butter
1 cup of brown sugar
1/4 cup of glucose syrup (the original recipe said corn syrup, but glucose seems to work and I don't know what the difference between them is, soo...)
1/4 teaspoon of bicarb soda
1 teaspoon of vanilla extract
1 cup of unpopped popcorn kernels
1 teaspoon or so of sea salt, to sprinkle on top.


  1. Preheat the oven to 95C. Pop the popcorn (either in a popcorn machine or on the stove, in a saucepan with a little bit of  oil), and place in a large (large!) bowl.
  2. Melt the butter in a saucepan. Stir in the brown sugar and the glucose syrup, and bring it to the boil, stirring constantly. Boil without stirring for 2-3 minutes, then remove the caramel from the syrup and stir in the bicarb soda and the vanilla.
  3. Pour the caramel in a thin stream over the popcorn and stir to combine. Place the popcorn in a single layer on baking trays (lined with greaseproof paper, caramel is hard to scrub off), and sprinkle all over with the salt. Bake for one hour, stirring every fifteen minutes.


Sunday 18 August 2013

Double Chocolate and Peanut Butter Cookies


Do you know what the best thing in the world is?

No? You give up?

Eating one of these cookies, warm and straight out of the oven, after not having eaten for 40 hours.

Yeah. I can see you drooling already and I'm only three sentences in.

(Just in case you were wondering I was giving up food and talking for the 40 Hour Famine I wasn't just starving for fun. It's also not too late to head on over to my page and donate some money - www.40hf.com.au/cookie_kenz - $40 can feed a family of six for a month, you know...)


Anyway, the point of this post is really just short and (deliciously) sweet: these cookies are crunchy and chewy on the outside, warm and melty on the inside, and full of peanut buttery, chocolate chunky goodness.

You're welcome :)


Double Chocolate and Peanut Butter Cookies

115g of butter, softened
1/2 cup of peanut butter (I used crunchy, but I'm sure you can use whatever you want)
1/2 cup of caster sugar
1/2 cup of brown sugar
1 egg
1 teaspoon of vanilla essence
1 cup of flour (I started off with one cup, but found it to be a little too wet, and ended up adding about another 1/4 of a cup)
1/2 teaspoon of bicarb soda
1 1/2 cups of chocolate chunks (I chopped up dark and white chocolate, mainly because we didn't have any chips left...)


  1. Beat the butter and peanut butter until pale. Add the sugars and beat for about a minute, then add the egg and vanilla until combined.
  2. Stir in the flour, bicarb and chocolate until combined. If it's too wet, add up to another 1/4 cup of flour, or refrigerate for 10 - 15 minutes.
  3. Scoop spoonfuls onto baking trays lined with baking paper, and bake at 190C for 9 - 11 minutes (depending upon how chewy or crunchy you like your cookies).
  4. Leave to cool on wire racks.


(The cookie was so warm and gooey that it just fell apart, haha)

Monday 22 July 2013

Muffins

Yo.


So are you ever baking, and have the sudden realisation of how much butter you just put into that bowl of icing? Or pour a couple of cups of sugar into the fudge and wonder, "Is this stuff seriously all that great for me?"

I'll admit it, those thoughts don't come around very often. Generally, I'm more that happy to use a couple of blocks of butter for croissants, or pour a container of cream into the caramel sauce. However, I stumbled across this recipe a while ago and I was intrigued by the ingredients...or lack thereof. Since then, I've been refining and perfecting the recipe to my taste and am super excited to present it to you :D

Let's get cracking!


Ingredients:

2 1/2 cups of rolled oats
1 cup of plain Greek yoghurt
2 eggs
1/2 cup of sugar
1 1/2 teaspoons of baking powder
1/2 teaspoon of bicarb soda
Flavourings: this time, I did raspberry and white chocolate  in one batch, and apple and cinnamon in another. However, you could very easily change the recipe to add blueberries, mashed bananas, chocolate chips, macadamias...whatever your little heart desires! ;)


  1. Line your muffin tins with foil or silicone liners - paper just doesn't seem to work very well with this recipe. If you don't have foil or silicone, then just grease the baking tins well with butter or oil.
  2. Put all of the ingredients excluding your flavourings (eg, raspberries and white chocolate chunks) into a blender or food processor and and process until the oats are smooth. The mixture will be quite runny, but if you let it sit for ten or so minutes, the oats soak up the moisture to make a thicker batter.
  3. Stir in the flavourings. I had about 1/2 cup each of raspberries and chopped chocolate for one half of the batter, and then finely chopped up a green apple and added a teaspoon of cinnamon for the other half. They were both delicious!
  4. Spoon the mixture into the muffin tins and bake at about 175C for 25-30 minutes.


ShareThis